Are you thinking of starting a blog? What if we told you that you could get started in less than 30 minutes plus FREE 30-Day trial web hosting for blog to test things out? Sounds interesting, right? In this How to Start a Blog Guide, we’ll show you the simple steps you can take today and start your very own blog in less than 30 minutes.
In this guide, we will provide you with access to a FREE trial web hosting for 30 days to use in setting up your new blog on WordPress, so keep reading.
But first, what does it mean to be a blogger? We believe this question is essential to give you the needed clarity to begin your blogging journey.
Most bloggers make a living off blogging. And they do this by monetizing their blog’s content through adverts, services, products, paid or affiliate offers, or even providing coaching.
On the other hand, some bloggers do so as a hobby or past-time. These bloggers find a topic they are passionate about and write their blogs to engage users with similar passions.
Whether you decide to blog as a hobby or means to earn a decent livelihood, the first step you need to take is to start a blog. So without further ado, let’s get into the nitty-gritty of how to start a blog today.
Here’s the table of contents of everything you’ll learn in How to Start A Blog Guide:
- 1. How to Start A Blog – Introduction to Blogging
- 2. How to Start a Blog in Less Than 30 Minutes
- Step #1: Select A Topic Area For Your Blog
- Step #2: Find A Suitable Name And Pick a Domain Name
- Step #3: Pick A Blogging Platform
- Step #4: Signup For 30-Day FREE Web Hosting Service
- Step #5: 1-Click WordPress Installation
- Step #6: Write & Publish Your First Blog Content
- Step #7: Create a Content Calendar
- Step #8: Free Resources for Your Blog
- Conclusion
1. How to Start A Blog – Introduction to Blogging

We’ll first get the introductory aspects of blogging out of the way to give you some perspective that you’ll need to start your blogging adventure. So let’s discuss the basics, and then we’ll dive into the details.
1.1. What Is A Blog and How Does It Work?
Simply put, a blog is an online journal or mini-website where you, as the blogger, share your perspectives on various topics of interest. It can serve as a platform to share your ideas, knowledge, positions, views, and thoughts.
The ultimate goal of a blog is to build an audience interested in the topic areas covered by the blog and to provide valuable information that educates and informs the blog’s readers.
Successful blogs work by continually providing a series of posts (i.e., articles) written by the blog owner or other contributors. The blog organizes such articles or posts in categories and chronological order.
There are several blogging platforms that you can use to start your blog, and WordPress is the most popular. So in this guide, we’re going to focus on the WordPress blogging platform and how to use it to accomplish your blogging quest.
1.2 How Do You Become a Blogger?
Now that you have an idea of what a blog is and how it works, the next question you’ll probably ask is how to become a blogger. Well, it’s quite simple – you become a blogger by starting a blog. It’s as simple as that.
But to start a blog, you need to know the steps. And that’s what this guide is all about. So keep reading, and by the end of the guide, be rest assured that you’ll become a blogger.
In general, you need the following follow these steps to become a blogger:
1. Define your blog niche (i.e., topic or interest area)
2. Find a suitable name for your blog, domain name, and logo
3. Select a blogging platform (e.g., WordPress) and web hosting
4. Choose an appropriate design theme for your blog (i.e., the look and feel you want to project)
5. Write your first series of content and launch your blog
5. Write your first series of content and launch your blog
The above are the necessary steps to becoming a blogger. We’ll dive into them shortly and guide you on how to go about each of them.
1.3 How Do You Get Paid as a Blogger?
Many people around the world are making a profitable living blogging. Blogging is a highly recommended way to work for yourself from your home’s comfort.
However, it’s not a get-rich-quick scheme; you need to horn your skills and understand your audience. But once you’ve put in the necessary work, there’s no limit to your earning potential.
So how do you get paid as a blogger? You get paid as a blogger by employing various monetization strategies for your blog. Here are some of the primary monetization options you need to familiarize yourself with:
1.3.1 Advertising
Monetizing through advertising platforms such as Google Ads or Media.net is often the first step new bloggers take to earn money from their blogging effort.
The process is rather simple, you sign up with the advertising platform and provide you with a piece of code to place on your blog, and that’s it. That piece of code will connect with the advertising platform’s software to pull relevant third-party ads and display them on their website.
As the blogger, you earn money when someone clicks on the ads through a 70/30 or 60/40 split (something like that). Also, some advertising platforms will pay you a certain amount for a thousand ad impressions displayed on your blog.
Furthermore, if your blog is well-known, you’ll realize that you can sell ads directly to advertisers and avoid the ad platforms entirely. By selling the ads directly, you get to keep 100% of all proceeds, thus increasing your earning potentials through blogging.
1.3.2 Affiliate Program
Another option for monetizing your blog is to join an affiliate program. Several affiliate programs will pay you commission for each lead or sale you generate for them.
As an affiliate, you’ll get to promote offers on your blog or email list (if you have one), and if someone clicks on the offer and signs up, you get a commission – it’s that simple.
1.3.3 Your Products & Services
Some bloggers have ventured to develop their products and services to sell to their audience. So if you write an eBook or have a T-Shirt, these are products and services you can sell to your blog’s audience.
So now you have an idea on how to earn and get paid as a blogger. Let’s jump into the exciting part of how to start a blog.
2. How to Start a Blog in Less Than 30 Minutes

Now that we’ve covered the first aspect of this guide let’s get to the real deal on how to start a blog – and do it in less than 30 minutes.
As a matter of fact, we started this blog you’re reading in less than 30 minutes, and we’re about to share with you the secrets and shortcuts that will save you time and headaches.
Remember, at the beginning of this guide, we told you that starting a blog is easier than you think – with the right direction, of course. So we suggest you follow the steps outlined here, and by the time you’re through, you’ll have your blog up and running.
By the way, as part of this guide, you’ll get a 30 days FREE trial web hosting for your blog – this offer enables you to get started without spending a dime!
Here are the steps on how to start a blog:
Step #1: Select A Topic Area For Your Blog
When starting a blog, it’s crucial to have a target audience in mind. Once you have a concept of who your target audience is, then find topic areas that you enjoy and are of interest to them.
Furthermore, it would be best if you enjoyed what you do as a blogger. So if you write of topics that are of no interest to you, you won’t last long as a blogger. You’ve got to dig deep within to find things that matter to you, define your audience for those things, and begin your blog.
For example, if you enjoy traveling and taking pictures of travel destinations, consider a travel blog. Likewise, if you enjoy cooking and have great recipes that people love, then start a cooking/food blog.
The key is to focus on a topic you are passionate about or one that is of interest to you. And if you are an expert in that topic area, that’s even better as this will help establish your blog as an authority in that subject matter.
Here are some tips to get you going with selecting a topic for your blog:
– Explore your passions and interests
– Utilize your expertise and knowledge
– Share your journey and adventure with like minds
– Lean in and focus your blog on a topic area of interest to you and your target audience
Step #2: Find A Suitable Name And Pick a Domain Name
Now that you have an idea of the topic area for your new blog, the next step is to decide on a name for your blog. Yes, you need to name your blog! Your blog’s name is your brand, and you need to think like a business.
When your blog grows in the future, the name is its brand equity, so you must give some serious thought to choosing a name that reflects the ideals and aspirations of your blog.
Overall, an ideal blog name should be descriptive and tell potential readers what the blog is about upon mention. So take some time out, read a book, open up the dictionary, and study other blogs to come up with a suitable name for your blog.
Make sure that the name you choose for your blog is registerable as a domain name. A domain name is your blog’s website address on the Internet – e.g. www.YourBlogName.com (can also be a .net, .org, .co, .ws, etc).
You can use the domain name availability checker to see if the domain name for your blog name is available.
However, you don’t have to register a domain name right now. The FREE 30 Day Trial Blog Web Hosting Offer gives you a free sub-domain name to use.
Once you get your blog up and running within the 30 days trial, you can then decide to switch to a paid web hosting and get a domain name in the process.
Step #3: Pick A Blogging Platform
A blogging platform enables you to publish your blog posts on the Internet. It’s a content management system (CMS) that you need to write, organize, and make your blog’s contents available to your audience.
As you can imagine, there are several platforms available for blogging. Some of them are easy to use and flexible, whereas others are a little difficult to master and limited in features.
According to BuiltWith, a leading website profiler and usage analytics provider, WordPress is by far the most popular blogging platform with over 27 million blogs and websites using the blog.
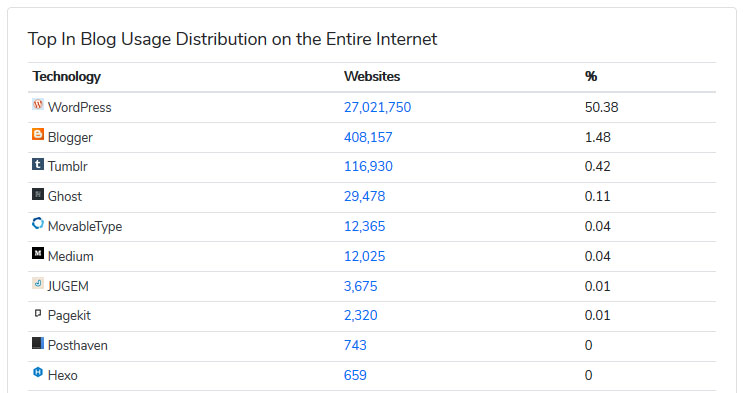
So this guide is going to focus solely on getting you started with blogging on the WordPress platform—however, other blogging platforms such as Blogger, Medium, Tumblr, MovableType, Ghost, etc. available for use.
WordPress offers hosted and self-hosted versions. The hosted version is accessible via WordPress.com, whereas the self-hosted version is downloadable via WordPress.org.
Don’t worry. You won’t need to download and install any software, the FREE 30 Day Trial Blog Web Hosting Offer gives you a 1-Click WordPress installer to make things easy for you.
But hold on, what is the difference between WordPress.com and WordPress.org versions of WordPress? It’s rather simple:
WordPress.com gives you a hosted version of WordPress under the www.WordPress.com domain name (for example, yourdomainname.wordpress.com), it’s free but limited in features and your income potential.
On the other hand, with WordPress.org, you install the core WordPress software on your web hosting account, customize, expand, and monetize it as you see fit. You can also run it on your domain name (for example, www.YourBlogName.com), and there are several themes available to you to make your blog look awesome.
Overall, WordPress.org blogging platform is the preferred option for bloggers, and we will focus on it and provide you with all the necessary details you need to set it up.
Step #4: Signup For 30-Day FREE Web Hosting Service
You’ll need a web hosting service to launch your blog.
So what is web hosting?
Web hosting is a service offered by a web hosting provider like DailyRazor.com. The web hosting provider allocates you space on its web server, and the web hosting is where you’ll upload your website or blog.
By uploading your website or blog files to the web hosting provider’s web server, the website or blog is then accessible on the Internet.
Therefore, a web hosting service is an essential aspect of your blogging journey.
Now, web hosting can be expensive, with bloggers spending as hundreds of dollars yearly. However, for this guide on how to start a blog, you’ll get a 30 Days FREE Trial Web Hosting.
We’re confident that if you follow this guide diligently, you’ll have your blog up and running within the 30 days without spending a dime.
Once your blog is up and running, you can choose to upgrade your FREE Trial to a paid service starting at just $113.34 for the first three years – that’s less than 11 cents ($0.11) per day!
To begin with, click here to sign up for your free 30 days trial web hosting and following these steps:
1. Visit the signup page
1. Visit the signup page and sign up for your FREE 30-Day Trial for Fast Blog Hosting.
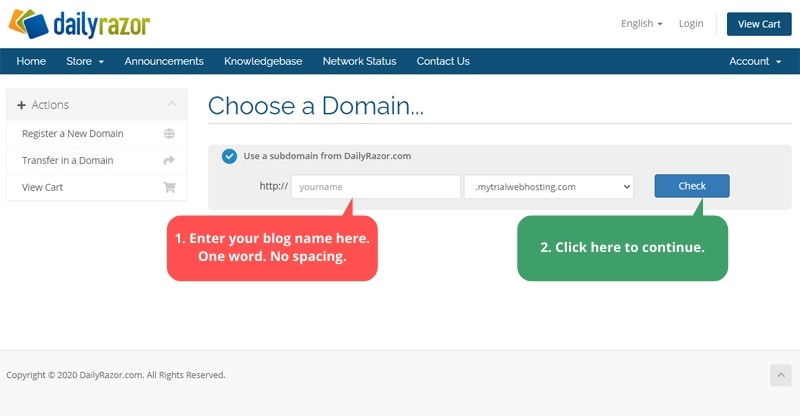
2. Enter your blog name
2. Next, enter the name of your blog, as shown in the image below, and click on the “Check” button. Note: if the name of your blog is “My Awesome Blog“, enter the name like this “myawesomeblog“. Ensure that the number of letters/characters is not too long – at least no more than 28 letters/characters will be ideal for your blog name.
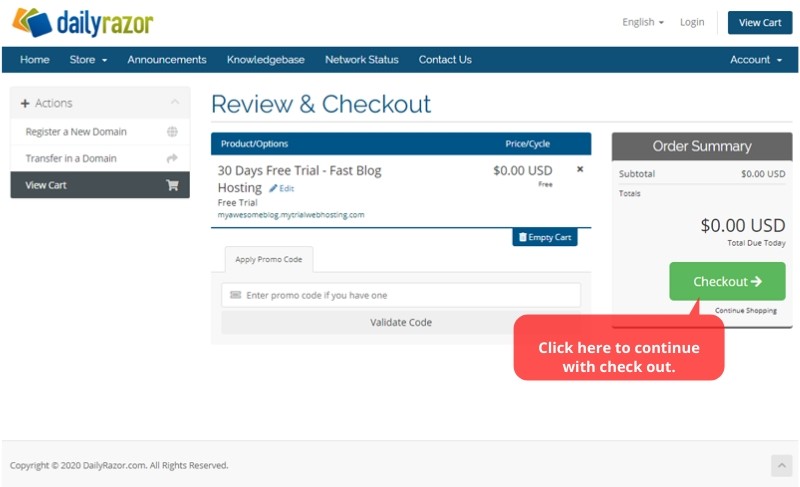
3. Review and begin checkout
3. Review and begin the checkout process to complete your FREE trial order. Note, we will set up your FREE Trial on a sub-domain (i.e., yourblogname.mytrialwebhosting.com). Doing so gives you the flexibility to set up your blog without paying for domain name registration fees. When you’re ready to make your domain name live, you can then choose and register a domain name and update your hosting to the registered domain name.
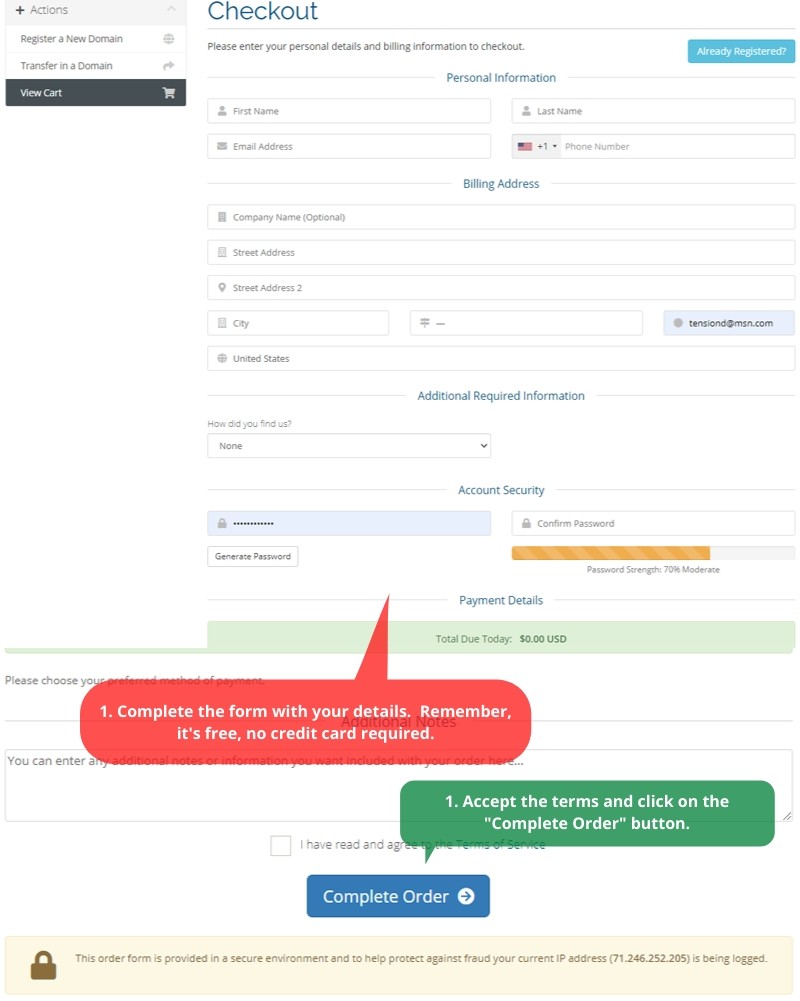
4. Complete 30-Day FREE web hosting signup
4. Complete order form and click, accept the terms of service and click on the “Complete Order” to finish signing up for your FREE 30-Day Trial Web Hosting.
Congratulations. You’ve just completed the signup process for your 30-Day FREE Web Hosting Trial. You’ll get an email with your web hosting details once we set up your service. If you placed your order after 6 P.M (EST – New York Time) – please allow up to 24 hours to get your FREE 30-Day Trial Web Hosting set up details.
Step #5: 1-Click WordPress Installation
By now, you’ve gotten your FREE 30-Day Trial Web Hosting details. It’s time to get into the fun stuff and install WordPress. So just take the following steps to get WordPress installed.
1. Log into your web hosting control panel.
We sent you an email with the subject line “DailyRazor Hosting :: New Account Login Information” – this email contains your web hosting account details.
So open that email and located the following information:
Username
Password
Control Panel URL
You’ll need the above information to access your web hosting account’s control panel and being the WordPress installation process.
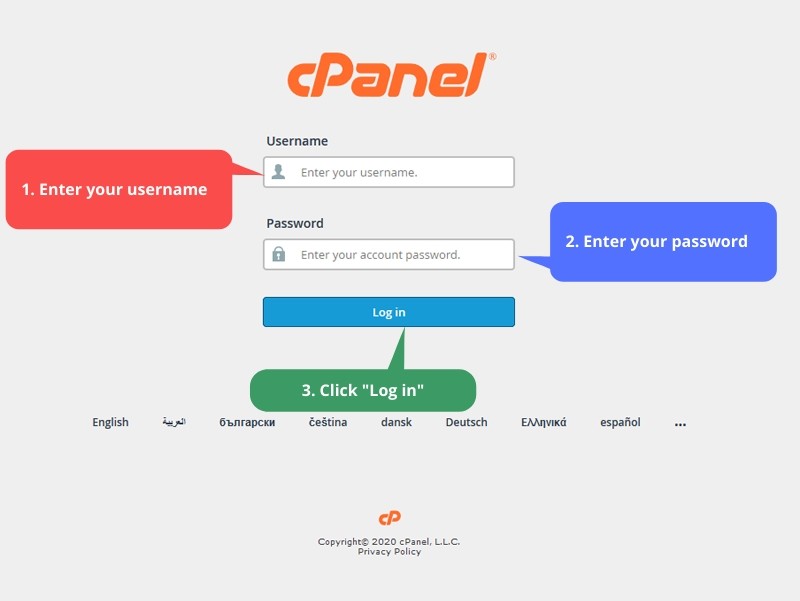
For this guide’s purposes, the Control Panel URL for the web hosting account we signed up for above is https://ldz3.dailyrazor.com:2083 (so make sure you check your email to get your own Control Panel URL).
When we visit that URL on our web browse, we see the following – so enter your username, password and click the “Log in” button to access the control panel.
2. Configure WordPress Install with the Software Installer
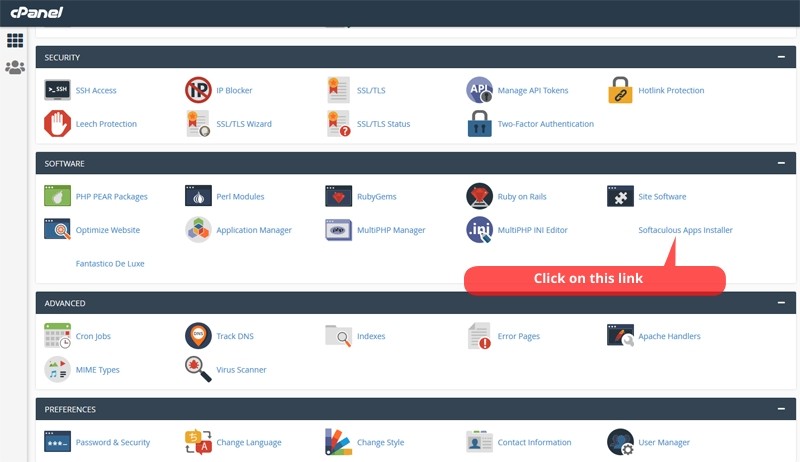
Once you’ve logged into your control panel, locate the “Softaculous Apps Installer” link and click it to access the software installer.
Softaculous App Installer is a software tool we offer to save lots of time you’ll otherwise spend doing manual WordPress installation.
Next, click on the WordPress button to start the installation process.
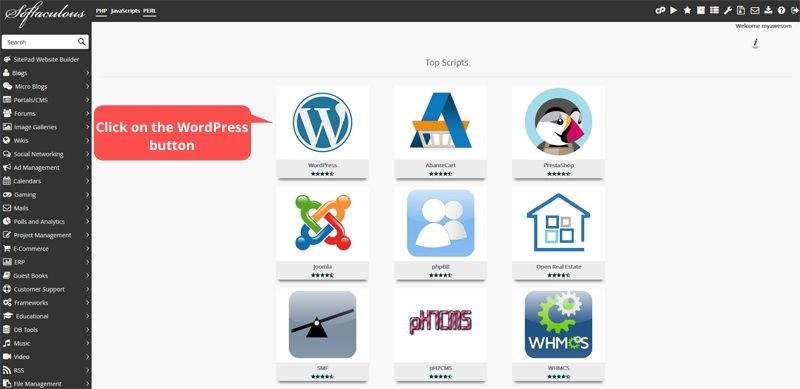
Softaculous divides the WordPress installation page into the following sections:
Software Setup
Site Settings
Admin Account
Choose Language
Select Plugin(s)
Advanced Options
Select Theme
So we’ll go through each section and provide you with guidance on what information to provide.
A. Software Setup

For the “Choose the version you want to install” option, select the latest version from the drop-down list.
And for the “Choose Installation URL” option, select the “http://” option for “Choose Protocol“. Your sub-domain is by default for “Choose Domain“, leave it as is. Then for “In Directory” – delete “wp” and leave it blank. We will install WordPress on the root directory of your web hosting – so there’s no need to specify an installation folder/directory.
B. Site Settings

For Site Settings, enter the name of our blog for “Site Name” and a short description of your blog for “Site Description“. Leave the “Enable Multisite (WPMU)” option unchecked.
C. Admin Account

Next, you need to specify a Username and Password to your WordPress administrator account.
You’ll use this Username and Password to access the WordPress Admin page, where you’ll manage your WordPress blog and create and publish your blog posts.
D. Choose Language

Now, select the language you’ll be writing your blog. The installer selects the English language by default, so if you are writing your blog in English, leave that option selected.
E. Select Plugin(s)

The next option allows you to specify pre-installed WordPress Plugins. For this How to Start a Blog guide, don’t select any of the two Plugin options provided. Just leave the two checkboxes unchecked.
A WordPress Plugin is a small app that supports a specific or group of functions performed within WordPress. Plugins extend WordPress core-functionality and add new features and capabilities. For example, a security plugin can provide added security for your WordPress blog, whereas an SEO plugin provides extra SEO capabilities.
F. Advanced Options

Now, it’s time to specify some advanced options. So where you’ll be entering information for the following options:
Database Name: choose a short name for your database (for example – mywpblog) or leave the random database name already entered by default – it doesn’t matter.
Table Prefix: Your blog’s database is several tables. So you can enter your preferred prefix (no more than four characters) or leave the default prefix already provided.
Disable Update Notifications Emails: check this box to disable notifications by updates to your WordPress blog
Auto Upgrade: specify what you want the installer to do when there’s a new WordPress version available. We recommend you select the “Upgrade to Minor versions only” option. You don’t want automatic updates to Major releases as this can break your WordPress site if there are new features that are not compatible with your current theme or plugin(s).
Auto Upgrade WordPress Plugins: check this box if you want your plugins upgraded automatically (you can leave it unchecked).
Auto Upgrade WordPress Themes: check this box if you want your theme upgraded automatically (you can leave it unchecked).
Backup Location: specify the location for your backups, leave this option to the “Default” value.
G. Select Theme
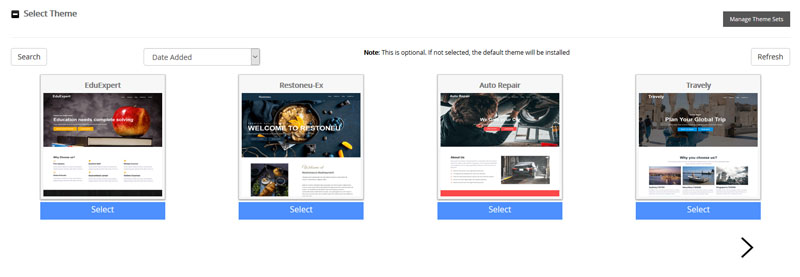
Now, the last option is to select a Theme for your blog. The installer provides you with several free themes to get started. So, click on the “Search” button and type in “blog” in the search box that pops up to take advantage of these free themes.
The search returns two theme options for the search results. Locate the “Blogger” theme and click on the “Select this” button to select that theme.
3. Click to Install WordPress

Now, enter your email address where it says “Email installation details to:” and then click on the “Install” button to install WordPress.
The WordPress installation can take up to three minutes, so don’t leave the page until it’s complete. Once the installation is complete, you’ll get a confirmation page like this one:
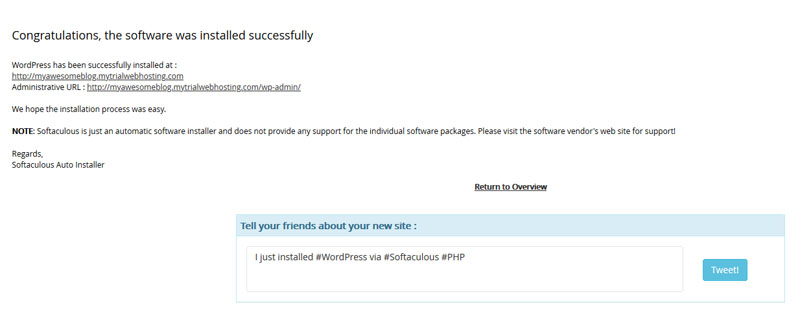
Congratulations, you’ve just installed your WordPress blog using this handy How to Start A Blog guide.
But we’re not yet done, let’s get ready to publish your first blog post. The first thing you need to do is to log into your WordPress Admin page.
The URL to the admin page (called Administrative URL) is shown on the above confirmation page and in the email notification sent to you upon successful install.
Step #6: Write & Publish Your First Blog Content
Now that you have WordPress installed, it’s time to write and publish your first blog post.
When it comes to writing your first blog content, make sure that you focus on your target audience. Your audience must see you as passionate, open, and trustworthy.
Let your audience know (through your posts) that your blog exists to add value to their lives and help with their pain points.
If you can successfully do all this, you’re on your way to becoming a successful blogger.
So take some time to think of your first blog posts, but don’t overthink it. You don’t want to get caught up in “analysis paralysis” – the key to being a good blogger is to start blogging and learning throughout the process.
Therefore, for this How to Start A Blog guide – you get to write and publish your first blog post by just doing it!
1. Log in to WordPress Admin
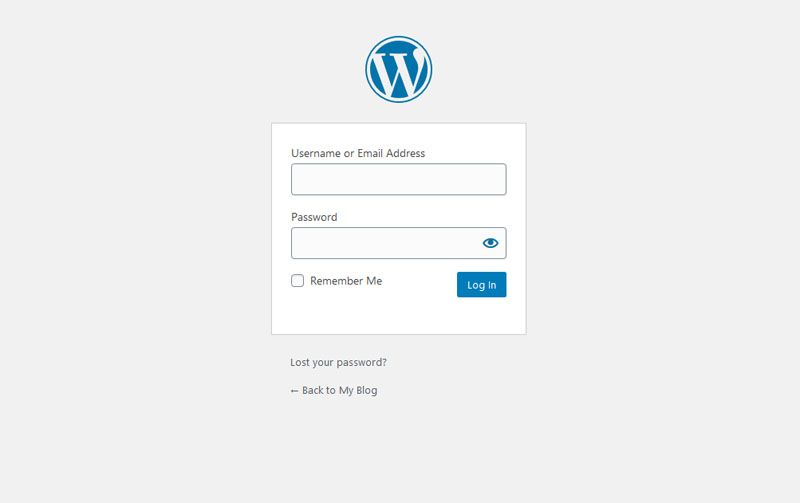
When you visit the WordPress Administrative URL, you’ll have to enter your Username and Password that you specified during WordPress installation.
Enter the Username and Password then click on the “Log in” button to access the WordPress Admin dashboard which looks like this:
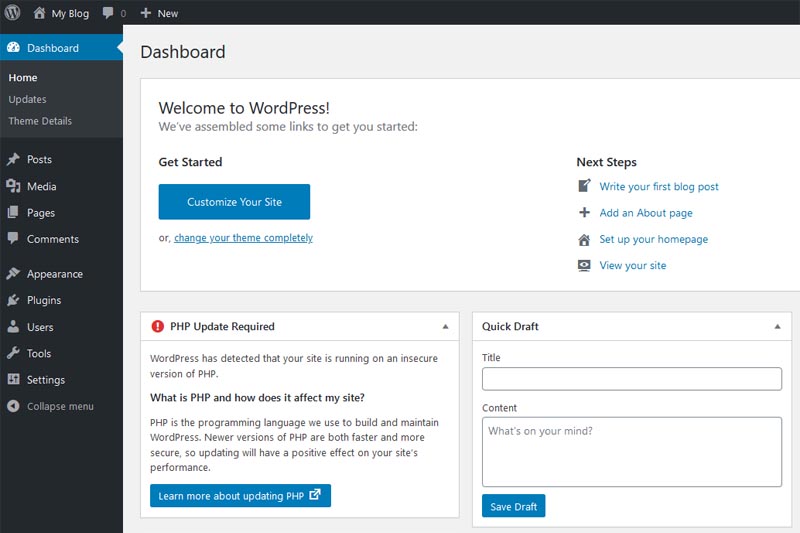
2. Add New Post
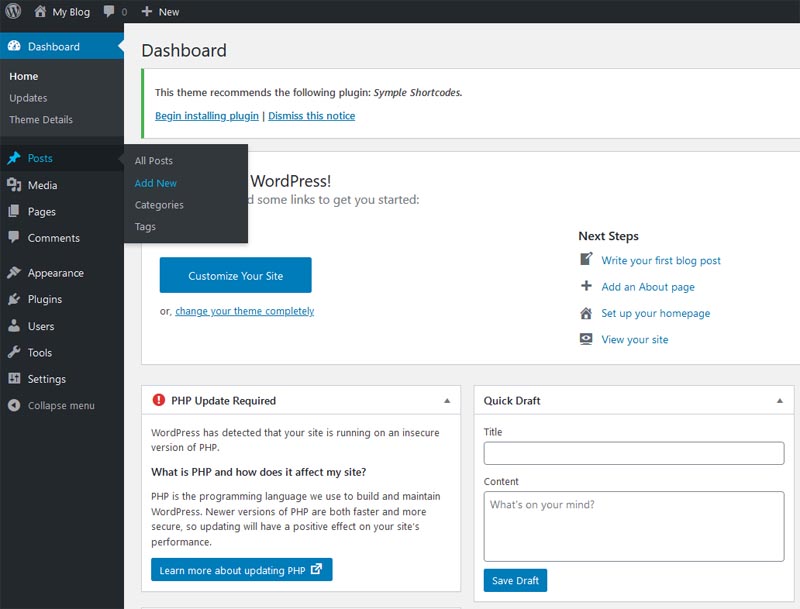
Once logged in, put your mouse over the “Posts” link on the left-hand side of your screen and select “Add New” from the menu that slides out.
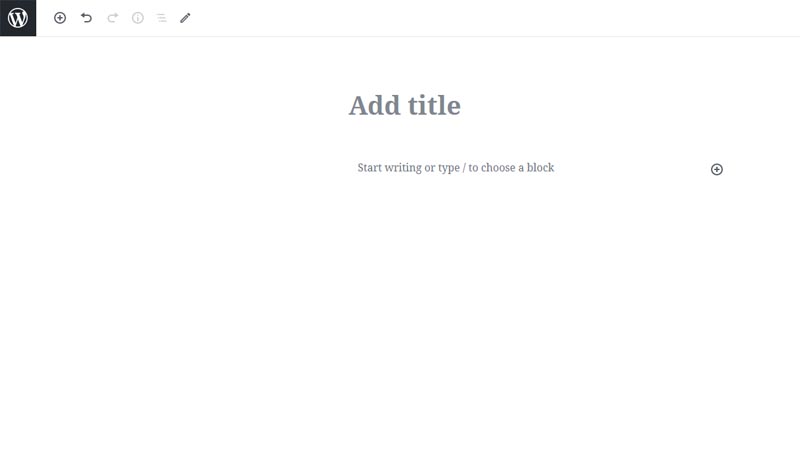
Now, click on where it says, “Start writing or type / to choose a block” to start writing your content. Here’s a look at what we entered:
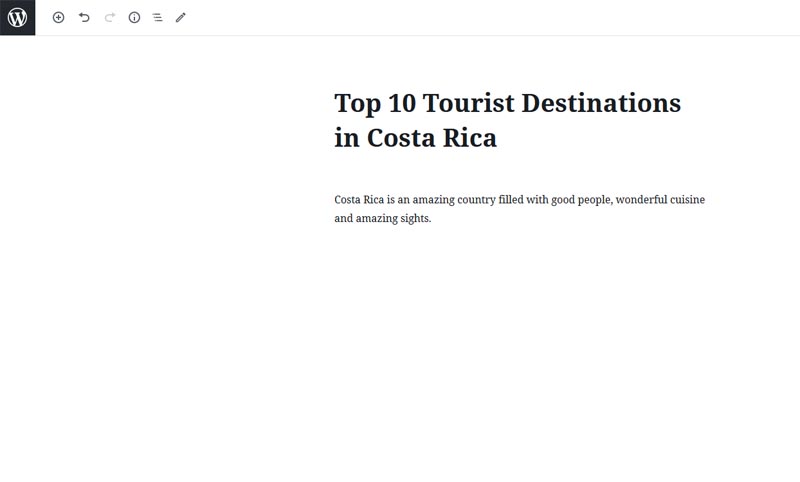
3. Publish Post
So go ahead and writing the first blog post. When finished, click on the “Preview” button at the top right-hand side to preview your posts.
And when you’re ready to publish, click on the “Publish” button at the top-right hand side to publish and make your post live for your audience to consume.
Step #7: Create a Content Calendar
As a blogger, it’s crucial to have a content schedule via a content calendar. Your content calendar will serve as the organizational architecture for creating regular content and posting on schedule.
So you need to see your content calendar as an essential working framework that helps you keep organized and focused on your new blog’s core objectives.
Once you have your content calendar created – STICK TO IT – this will require a lot of discipline. But as the saying goes “Manners maketh man (as well as a woman)”
Step #8: Free Resources for Your Blog
Now, let’s equip you with some free resources that you can use to make your blog the best it can be without being separated from your hard-earned money!
1. Canva
Haven’t heard of Canva? Well, now you have. Canva is an excellent tool that you can use to create graphics for your new blog.
2. CoffeeCup
CoffeeCup enables you to write HTML code without any coding experience quickly. It’s a user-friendly HTML editor that has been around since 1996. So if you don’t have any coding skills, do not fret, CoffeeCup will do the heavy lifting for you.
3. Creative Market
One thing that you will need lots of as a blogger as graphics. And by graphics we’re talking about images, fonts, designs, themes, you name it. Creative Market got your back with their FREE graphics gallery in addition to their paid ones.
4. Design Library
Your blog’s look and feel are vital for success. And starting, you may not have the budget to pay a designer to come up with a great look and feel for your blog.
However, there are several beautiful themes out there that you can use to give your new blog the edge it deserves. Here’s a useful resource for free blog themes for your WordPress blog platform you just launched.
5. Free Stock Photos
You need fantastic photos as a blogger. There are abundant free stock photo resources that you can leverage to make your blog come alive.
For one, take a look at Unsplash – they are among the leading sources for freely-usable images across the Internet.
Conclusion

As you can see, there’s isn’t much to start a blog. And if you’ve thought it to be a complicated task, we hope that this How to Start A Blog guide has provided the essential insights needed.
Now that you’ve gotten a working version of your blog going, you need to continually educate yourself about blogging and learn from the best to grow your blog and add value to your audience.
It’s not going to be an easy journey, but you can rest assured that it’s going to be rewarding. It is rewarding both financially and for self-fulfillment.
Don’t be afraid to try new things, learn new concepts, improve yourself, and give your audience a fantastic experience.
Goodluck.

